The repository setup used in this article is based on Github recommendations about how to keep your fork updated. The main idea behind it is that you setup two remote servers on your local git repo.
As a practical example I'll use the main Joomla! CMS repository as upstream and my fork of the Joomla! CMS as origin. Of course this works with any other github project.
I use git from command line but you don't have to stop reading here :) I hope this article will help you to understand the concepts required to use any git client.
Index
- Proposed repositories structure.
- Setting up the local repository.
- Advices before creating your first patch.
- Creating your first patch.
1. Proposed repositories structure
Following Github recommendations this is the base schema we want to setup:
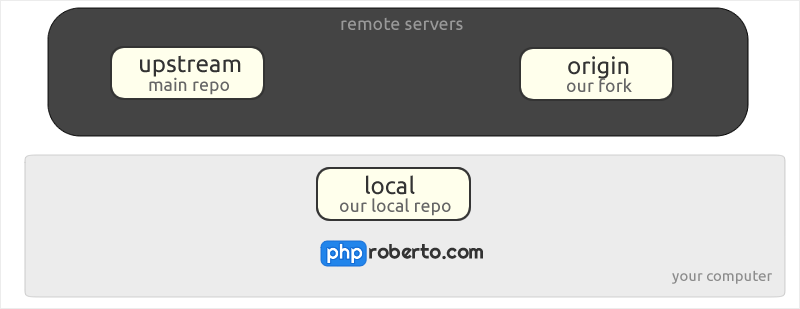
- Upstream: This is the main project repository. We will use it mainly to keep our branches up to date and explore remote changes/branches when needed.
- Origin: Our fork is where we will push our patches to create pull requests in github. What is a pull request? We will see it later but it's a way to tell the main project that you have something cool to contribute. Think in it as telling the main project: "hey, I have done this modification. Look at it and feel free to get it if you like it".
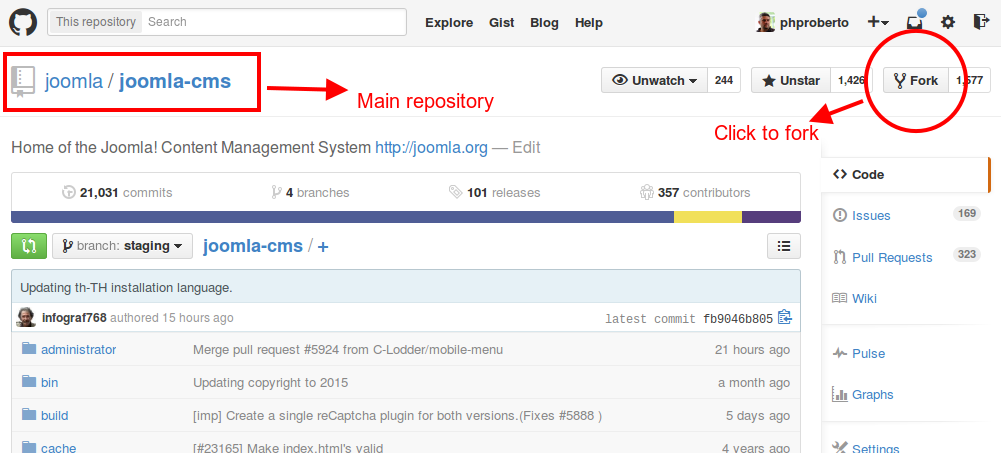
So the first step is to fork the repository you want to contribute to. In our example the Joomla CMS repo. To fork a repository go to its github page and click the Fork button:
After forking the repository you will be redirected to your fork page:
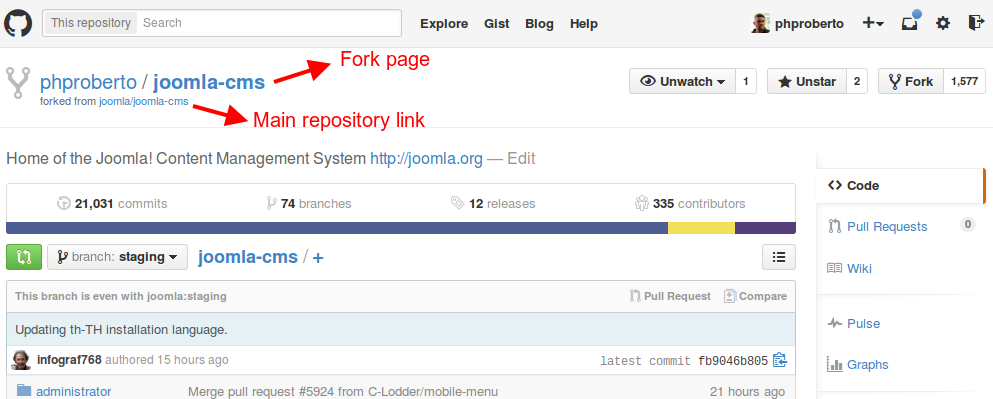
We are done with github for now. Time to setup things in our local machine. Remember:
- joomla/joomla-cms -> upstream (main repository)
- phproberto/joomla-cms -> origin (our fork)
From now in advance I will refer to them as upstream and origin.
2. Setting up the local repository
We now have to clone our fork repository in our local machine. There is a common mistake here: people clones the upstream repo instead of their fork. Not a big problem because you can add/remove remote servers later but doing it in the right order saves you that.
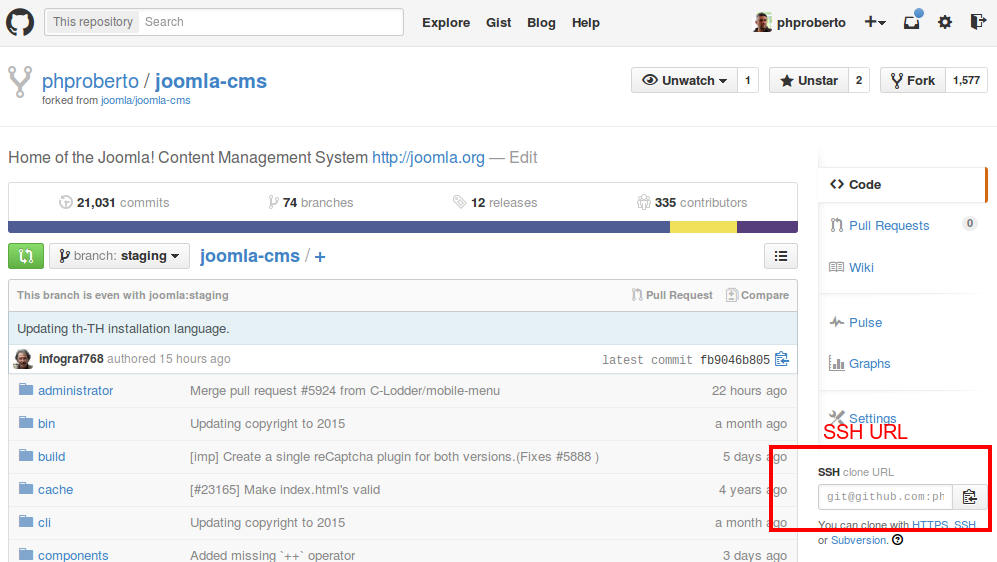
To clone our origin we need the SSH URL of the repo. You can find that on any github project page:
In your local machine go to the folder where you want to clone the repository. I use a code/joomla folder in my user folder for most projects but Joomla CMS requires you to be able to navigate through the page so the best place to clone it is in your Apache/Nginx www folder.
To clone the repository use the command:
cd /var/www
git clone This email address is being protected from spambots. You need JavaScript enabled to view it.:phproberto/joomla-cms.git
This will create a /var/www/joomla-cms folder in your computer with the contents of the repo there. You should be able to navigate to it in your browser clicking in http://localhost/joomla-cms.
If you want to clone your repo to a folder with a different name you can do it with:
# Sample command to clone the repository inside a folder named jcms3x
git clone This email address is being protected from spambots. You need JavaScript enabled to view it.:phproberto/joomla-cms.git jcms3x
In the rest of the article we will suppose that you have cloned the repo inside a /var/www/joomla-cms folder.
When you clone a remote repository git does two things for you:
- Setup the provided SSH URL as
originserver - Create a local copy of the remote default branch. This is usually the
masterbranch but github allows you to customize it. Joomla CMS uses a branch namedstaginginstead.
You can play with that concepts with the commands:
cd ~/code/joomla/joomla-cms
# List the available remote repositories
git remote show
# Show details of a remote repository
git remote show origin
# List the available local branches
git branch
You can also add as many remote servers as you want. To create/remove repositories you only need to know a couple of commands:
# Remove the remote origin
git remote rm origin
# Add a remote server named "upstream"
git remote add upstream {SSH URL}
Let's use it to solve the problem I commented before: you cloned the upstream server instead of the origin. We will simply remove the remote origin and create it again with the correct SSH URL:
# Remove our remote origin
git remote rm origin
# Create a new origin from our fork SSH URL
git remote add origin This email address is being protected from spambots. You need JavaScript enabled to view it.:phproberto/joomla-cms.git
Now that we know how to deal with remotes let's add the upstream server to our repo:
git remote add upstream This email address is being protected from spambots. You need JavaScript enabled to view it.:joomla/joomla-cms.git
This will allow us to connect to it whenever we need it.
The system is ready. You can now start working locally but first let's summarize what we have now in our computer:
- A remote server with name
originpointing to our fork (This email address is being protected from spambots. You need JavaScript enabled to view it.:phproberto/joomla-cms.git) - A remote origin named
upstreampointing to the main repo (This email address is being protected from spambots. You need JavaScript enabled to view it.:joomla/joomla-cms.git) - A updated local copy of the default branch named
stagingin our example.
3. Advices before starting to work
There are a number of important things that you have to know to save you a lot of headaches when you start using git or contributing to projects. Take the time to prepare you and your computer before starting to send patches to a project. The more time you invest before the more time and problems you save later.
3.1. Keep your default branch clean!
This is the most important rule. Not doing it will cause a lot of unexpected issues even if you are the only one working on the repo. Try to adopt the most good practice/habits as you can.
The main branch (master usually and staging in Joomla CMS) has to be the root of all our branches and the upstream updates entry point to update other branches. Whenever you need to work on something this is my recommended workflow:
# Switch to our staging branch
git checkout staging
# Update our staging branch with the latest changes in upstream
git pull upstream staging
# Create a new branch for our patch
git branch my-patch
# Switch to our new branch
git checkout my-patch
To avoid confusing readers I've used the most descriptive commands but there is a faster way to create a branch and switch to it:
git checkout -b my-patch
I have to tell it again: remember that most of the times you have to do that from your default branch!
The most common error is that users forget to switch back to the staging branch and create new patches from a previous patch branch. This will cause that your patch inherits your previous patch commits and your pull request will be unusable and closed.
3.2. Check contributing guidelines
Most repositories have requirements to start contributing. Github gives you a fast way to publish them just creating a CONTRIBUTING.md file inside your repository.
This is a sample contributing file from Symfony:
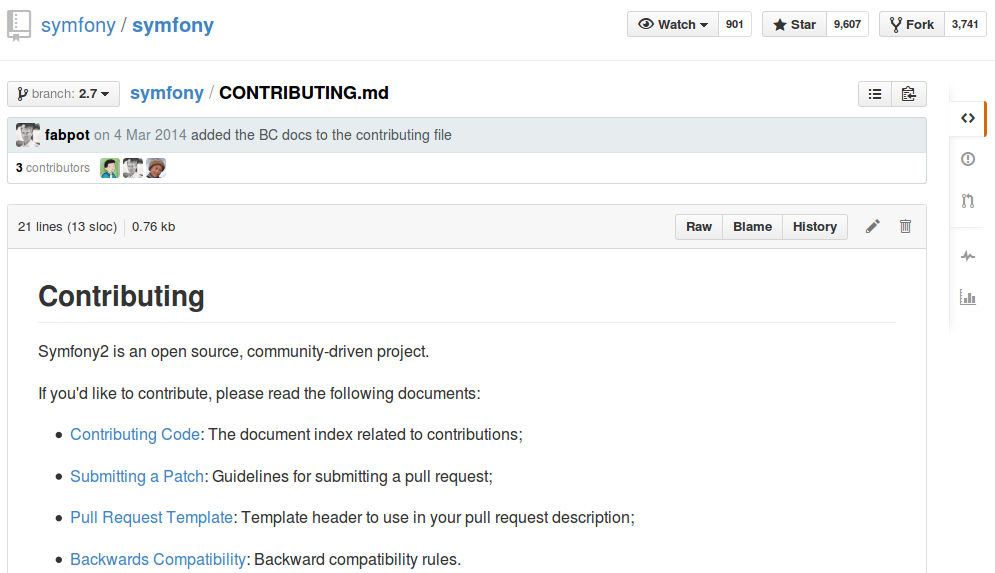
The most common requirements are:
- Coding standards: all the code inside a project should be written as if it was written by the same person. That's why coding standards exist. Some repositories include Travis integrations that automatically check your markup to detect coding standard errors. A pull request that doesn't follow them cannot be merged (actually it can but it won't :D ).
- Documentation: your code isn't all that a project needs. Is a good practice that you waste the time to write documentation when you implement a new feature to describe how it works. In some projects this is a requirement. I try to do this in the pull request message when the repo doesn't require it. You will find yourself editing and improving your code when you are writing documentation.
- Unit testing: projects that include unit tests also require that you check the current unit tests and modify them properly if your pull request affects them or your are writing a new feature.
- Commit messages: some projects also require that your commit messages are written using a common pattern. Knowing this before start committing will save you time.
- Pull request templates: most people tends to write crap/undescriptive pull request messages. That's why some projects require you that fill a template with common questions about your contribution like "how to reproduce the issue?" "does your patch break Backward Compatibility?", etc. Remember that your pull request message is what will get maintainers and collaborators attention. The more information provided the better feedback you will receive.
3.3. Is your issue already solved/reported?
Never start to code without checking if a patch for your issue already exists. If a patch exists respect that developer and try to send a pull request against his/her repo. Create only a new pull request when you think that the existing patch is totally wrong or abandoned.
Think also in repository maintainers. If you don't waste your time searching for an existing patch is them who will have to do it to set is as a duplicated. There is nothing more annoying that an issue discussed in two different issues/pull requests.
3.4. Create pull requests when patches are ready.
Always remember that there is a group of people maintaining a project. Creating your patch when it's not ready will waste their time and cause your contribution to lose the focus. Would you publish a blog post when it's still half written?
Repositories with a lot of open pull requests are seeing by developers as projects lacking maintenance. Think in an unfinished pull request as something that will damage project's reputation. In the best case your pull request will be directly closed.
Your patch may need improvements after submitting it but be sure your patch is fully completed before creating a pull request. If you need to collaborate with others remember that your fork can receive pull requests itself. Create a branch in your fork and use it as a central collaborating point before sumitting a common pull request to the main repository.
3.5. Reviews make your code better.
You may think that your code is perfect but people reviewing it may think in something you haven't. Remember that contributing to a project is the best way to learn and improve as a developer. You should be grateful to anybody that wastes his/her time in make your code better.
So stay receptive, respectful and open to reviews. Not doing so will cause that people loses interest in your code.
4. Creating your first patch.
Congratulations and thanks if you are still here. Let's focus now on the workflow to create your first patch. Remember that the first thing is always to create a clean branch from your default updated branch. Let's write it again:
# Switch to our default branch
git checkout staging
# Update our staging branch with the latest changes in upstream
git pull upstream staging
# Create a new branch for our patch
git branch my-patch
# Switch to our new branch
git checkout my-patch
Now you can start to code. When your changes are done is time to know your new best friend: git status. What does it? It tells you which files have been modified in your repository. See an example (sorry but my terminal is in spanish) :

Here is what git detects:
- The file
components/com_content/controller.phphas been modified. - The file
components/com_content/router.phphas been deleted (probably a bad idea :D ). - Some sample files have been created inside
components/com_contentfolder (namedsample-file.php,sample-file1.php&sample-file2.php). - A new folder has been created in
components/com_content/sample-folder/(git does not list new folder contents).
Do no fear to use git status too many times. It's free! I use it almost as much as the <ENTER> key :)
After modifying your files you have to stage and commit them. Let's refresh the stage and commit concepts:
- Commit: is the action of submitting a group of modified files to your local repo giving them a descriptive message. This is a local command that won't change anything in origin or upstream servers. The associated git command is
git commit - Stage: As we have seen git automatically detects which files have been modified for you but when you want to commit something you need to tell git what files are you going to include. That's what stage means. If you create a commit without having staged any files the commit won't happen. The associated git command is
git add
To add something to stage you will mostly use:
# Add to stage any new or modified file (does not include deleted files)
git add .
# Add to stage only the modified files (includes deleted files)
git add -u
# Add to stage all the modified/new/deleted files
git add -A
I tend to use mostly the -A command. Let's see more examples to deal with specific files:
# Stage file administrator/components/com_content/views/article/tmpl/edit.php
git add administrator/components/com_content/views/article/tmpl/edit.php
# Stage any modified/deleted file inside the administrator folder
git add -u administrator
# Stage any new/modified/deleted ini file inside language folder
git add -A language/*.ini
Let's see what git status shows when I stage something:
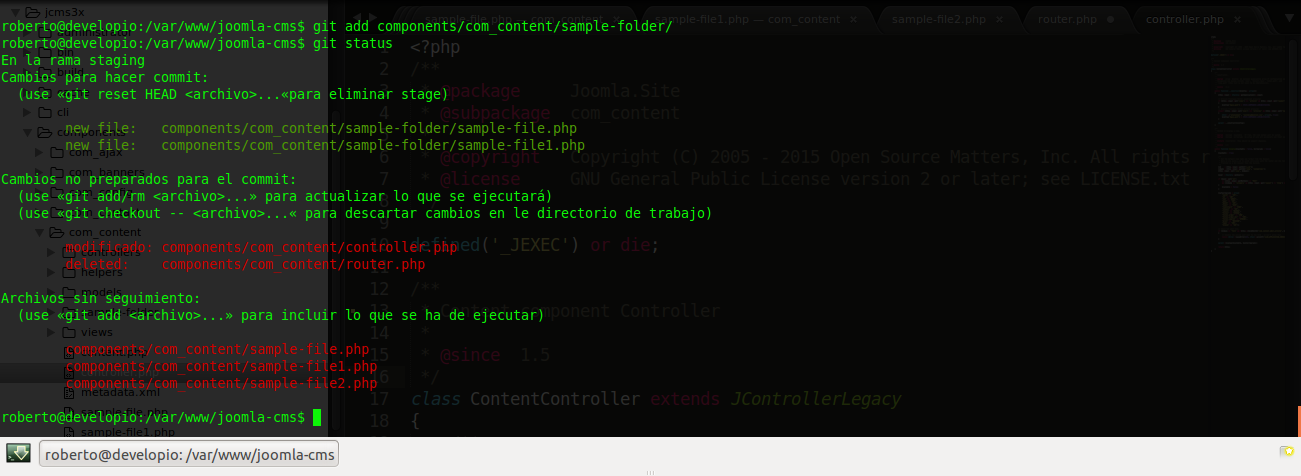
Note that you now have files in green. Those are your staged files. After adding a new folder to stage all its contents are detailed so you can always see the files that you are going to commit.
If you want to unstage something you can use:
# Unstage files inside folder components/com_content/sample-folder
 git reset HEAD components/com_content/sample-folder
After unstaging files you will see that they are not green anymore.
This article is long enough but git allows you to define your own aliases (commands). For example to execute the previous command I use:
git unstage components/com_content/sample-folder
You can check my git config file here.
Commit command is easy to understand. See this sample commits:
# Add again the sample-folder
git add components/com_content/sample-folder
# Commit changes
git commit -m 'Add sample-folder'
# Add all the modified files
git add -u
# Commit changes
git commit -m 'Break front controller and router :D'
# Add all the rest of files
git add -A
git commit -m 'Add new awesome files'
We add stage files with git add and then commit them with git commit. The -m modifier is to specify the commit message (m from message).
To review the list of commits we will use git log that now will output something like:

You can see there listed my three last commits. I guess that almost nobody is using git log directly but instead an alias to style it (see my git config file). An example of how my git l command looks like is:

There is much more information and better displayed than with the standard git log command.
Now is time to push the changes to our fork repository (origin). The push command uploads our branch to a remote server:
# git push <remote-server-name> <branch>
git push origin my-patch
Translating it woud mean something like: Upload to my origin server the branch named my-patch.
Once you branch is uploaded if you go to github you will see something like:
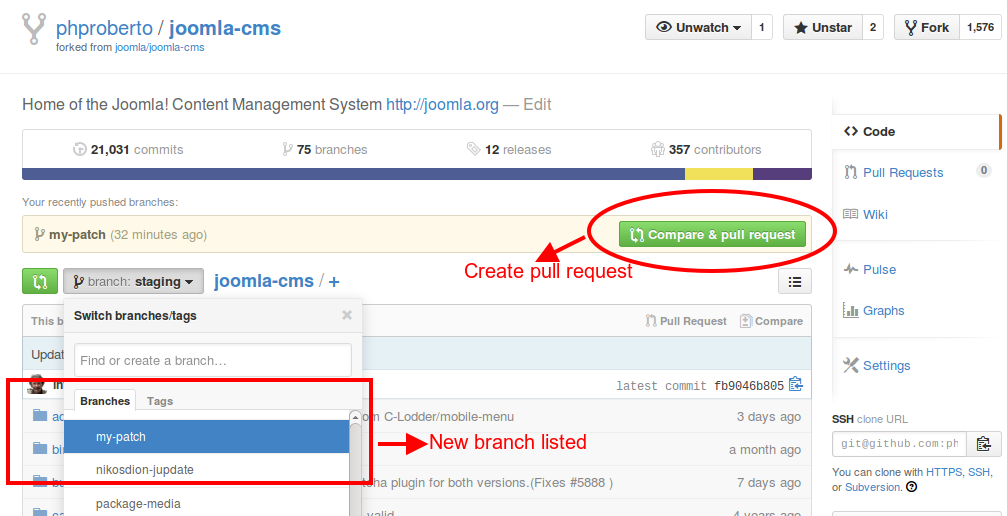
Github detects that we have created a new branch and asks us if we want to create a pull request. If you don't create the pull request inmediatelly you can always select the new branch in the dropdown and then click in the green buttom "Compare, review, create a pull request".
That's all remember to add a descriptive message to your pull request with all the information needed to reproduce the issue and the documentation for developers to use any new feature.
I wanted to write about extra things like how to keep your pull request up to date, how to squash commits, and things like stash and cherry pick but I've learned from the experience and I've moved it to another article that I'll publish next week.